
The Ultimate Saw Guide for Those Considering Woodworking
- Karen Fischer
- Jun 22, 2025
- 10 min read

As woodworkers who started as weekend DIYers and now run a woodworking business, we know one truth: Your saw choice makes or breaks your project. Pick wrong, and you'll fight your tools all day. Pick right, and your work flows smoother, cleaner, and safer.
This guide cuts through the noise to help you decide which saw is best for your woodworking tasks.
This isn't just another generic tool comparison - I'll share real-world insights from cutting thousands of board feet and specific recommendations for different project types. Whether you're setting up your first workshop or looking to expand your capabilities, this guide will help you make informed decisions about your next saw purchase.
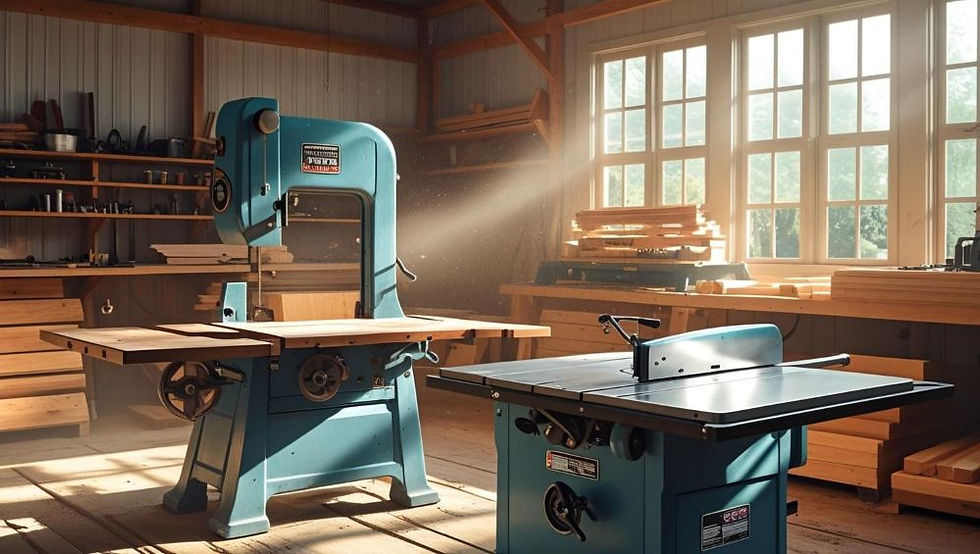
Straight Cuts - Circular Saw versus Table Saw Guide
Circular Saw
Best for :
Breaking down sheet goods (plywood, MDF)
Jobsite work
General construction projects
DIYers with limited space
Key Advantages:
Unmatched portability (especially cordless models)
Lower cost of entry than stationary tools
Versatility with different blades (wood, metal, masonry)
Space-saving for small workshops
What I've Learned Through Experience:
When I first started woodworking, I inherited my husband's old corded circular saw - a heavy, cumbersome beast that felt like wrestling with a stubborn mule on every cut. The weight made precise cuts nearly impossible, and after one too many crooked cuts, I knew I needed a better solution. That's when I discovered the game-changing difference a proper tool can make.
I invested in a RIDGID cordless circular saw, and it revolutionized my workflow in three key ways:
The lighter weight (nearly half the heft of the old saw) meant I could focus on guiding the cut rather than fighting the tool's weight.
The smaller blade size (6-1/2" vs the standard 7-1/4") proved to be an advantage for most of my projects, offering better control without sacrificing cutting capacity.
Cordless freedom eliminated the constant battle with power cords and opened up my entire workspace to safe, unencumbered cutting.
But the real breakthrough came when I paired it with an inexpensive rip fence attachment. For less than $50, this simple accessory transformed my cordless saw into a precision tool capable of handling jobs I previously thought required a table saw.
Tips:
Always use a sharp, high-quality blade - it makes more difference than you'd think
Invest in a good straightedge guide system
For plywood, place the "good" side down (the blade cuts upward)
Consider blade size carefully - larger isn't always better
The Table Saw
Best for:
Small and large Projects
Cabinet construction
Any project requiring repeatable precision
Advanced joinery (dados, rabbets, etc.)
Key Advantages:
Unparalleled accuracy with the fence system
Ability to handle large stock safely
Versatility with jigs and accessories
Superior dust collection compared to circular saws
What I've Learned Through Experience:
My table saw journey began with a compact Ryobi jobsite model - the perfect starter saw that helped me learn the fundamentals without overwhelming me. While it served me well initially, I gradually noticed its limitations: the lightweight frame made me nervous during cuts, the smaller table left me wanting more support, and the fence system required constant checking for accuracy.
Everything changed when we upgraded to a Delta 10" 15 amp saw. Though still considered a contractor's saw, the difference was night and day:
Stability & Safety: The heavier cast iron top and solid base eliminated vibration and wandering cuts that made me nervous. That extra weight translates directly to confidence during operation.
Work Surface: The expanded table surface means I'm not constantly fighting to support larger workpieces - they glide smoothly through cuts with proper support.
Precision Fence: The commercial-grade fence locks down rock-solid every time, eliminating the guesswork and constant re-checking I did with the jobsite saw.
But the real magic happened when my husband (our resident jig master) started building custom solutions:
Specialty Jigs: From taper jigs to crosscut sleds, these shop-made helpers turn complex cuts into repeatable, foolproof operations. I've learned that good jigs are worth their weight in sawdust.
Safety First: I use featherboards religiously (a simple addition that dramatically reduces kickback risk) and keep a stack of homemade push sticks at the ready. Our rule? If a push stick shows any wear, it gets replaced immediately - fingers aren't worth risking.
Dust Control: Hooking up to a proper dust collection system transformed our shop environment. No more holding my breath during cuts or spending more time cleaning than woodworking.
Tips:
Never compromise on fence quality - it's the soul of your table saw
Learn proper push stick techniques before attempting narrow cuts
Use the right blades and make sure they are sharp
Consider your space - hybrid saws offer cabinet saw performance in smaller packages
Invest in or make a good crosscut sled and other jigs for precision work
Making the Choice: Circular vs. Table Saw Guide
When to use a circular saw:
Breaking down full sheets of plywood
Jobsite or outside work where portability matters
When workshop space is limited
For occasional cuts that don't justify a table saw
When to use a table saw:
Multiple identical cuts (like cabinet parts)
Precision joinery wor
When working with long boards
For advanced techniques like dados and rabbets
Budget Considerations:
A quality circular saw costs $100-$300, while table saws range from $300 for basic models to $3000+ for professional cabinet saws. Before investing, consider how often you'll use it
Angled Cuts - The Mitre Saw Advantage Guide
Why a Mitre Saw is Essential
Best for:
Cross Grain cuts
Trim work (baseboards, crown moulding)
Picture frames
Door and window casings
Any project requiring precise angles
Key Advantages:
Speed and accuracy for angled cuts
Positive stops at common angles (22.5°, 45°, etc.)
Safer than making angled cuts on a table saw
Ability to cut wide stock with sliding models
What I've Learned Through Experience:
My mitre saw's evolution perfectly mirrors my growth as a woodworker. I began with a modest Ryobi 7-1/4" model - the perfect starter saw for small projects, though its limited cutting capacity meant constant workarounds. When I stumbled upon a 10" model at a garage sale, it felt like unlocking new potential, handling most of my trim work and small project needs with ease.
But the real game-changer came when we invested in the RIDGID 15 AMP 12-inch Dual Bevel Sliding Compound Mitre Saw. This powerhouse transformed my workflow in ways I never anticipated:
Expanded Capabilities: With a massive 70° bevel range and sliding action, it handles cuts I used to struggle with on the table saw. That 12" blade glides through thick stock effortlessly.
Unexpected Versatility: I've discovered it's surprisingly capable for certain long cuts - when I just need to trim end grain or make rough crosscuts quickly, the sliding feature often saves me from setting up the table saw.
Precision Meets Power: The dual bevel feature means no more flipping boards for perfect mitres, while the 15-amp motor powers through hardwoods without hesitation.
What's most surprising? How quickly this tool became indispensable. That little Ryobi served me well, but now that I've experienced the precision and capacity of a professional-grade mitre saw, I can't imagine my workshop without it. It's taught me that sometimes the right tool doesn't just make jobs easier and opens up new possibilities in your craft.
Tips:
Consider a sliding compound mitre saw if you work with wider boards
Laser guides are helpful but not essential - trust your marks
Keep the saw's bed clean for accurate cuts
Invest in a good stand - it makes a huge difference in usability
Mitre Saw vs. Table Saw for Angles
Mitre Saw Wins When:
You need to make numerous angled cuts quickly
Working with longer pieces of trim or moulding
Precision matters more than versatility
Safety is a primary concern
Table Saw Can Work When:
You need to make angled rips (lengthwise cuts)
When a mitre saw isn't available
For very small pieces that are unsafe on a mitre saw
Curved and Interior Cuts - Jigsaw vs. Scroll Saw Guide
The Jigsaw: Versatile Curve Cutter
Best for:
Cutting sink openings in countertops
Making curved cuts in shelves or tabletops
Quick rough cuts in various materials
DIY projects requiring flexibility
Key Advantages:
Ability to make interior cuts (start from a drilled hole)
Portable and easy to use
Affordable entry price
Can cut various materials with blade changes
What I've Learned Through Experience:
My journey with jigsaws began with an inherited relic - my father-in-law's ancient corded model that weighed a ton and seemed to have a mind of its own. Trying to guide that temperamental beast through curved cuts felt like wrestling an angry snake. The vibration was brutal, the cord was constantly in the way, and precision seemed impossible.
On a whim during a Walmart run, I spotted a budget cordless model from their in-house brand. Skeptical but desperate for relief, I took the $40 gamble. Here's what that experience taught me:
Lightness Matters: The reduced weight (nearly half of the old tank I was using) gave me actual control over the tool. Suddenly, following cut lines became possible rather than aspirational.
Cordless Freedom: Without that umbilical cord constantly snagging, I could position myself optimally for each cut. The difference in maneuverability was night and day.
Blade Knowledge is Power: I discovered that jigsaw performance is 90% about using the right blade.
More teeth = smoother cuts
Shorter blades = tighter curves
Specialty blades for different materials
Realistic Expectations: Since I only use it occasionally for curved cuts and cutouts, the budget model proved perfectly adequate. I learned that not every tool in my shop needs to be pro-grade.
The surprise lesson? Sometimes the solution isn't spending more, but spending smarter. That humble $40 tool, paired with the right blades and techniques, outperformed the expensive old dinosaur in every way that mattered for my needs. It's a reminder that in woodworking, the best tool isn't always the most expensive one - it's the one you'll actually use effectively.
Tips:
Use a slower speed for cleaner cuts in wood
Clamp your workpiece securely to prevent vibration
For tight curves, use a narrower blade
Consider orbital action settings for faster but rougher cuts
The Scroll Saw: Precision Detail Tool
Best for:
Intricate fretwork
Wooden puzzles and toys
Marquetry and inlay work
Detailed decorative pieces
Key Advantages:
Ability to make extremely tight turns
Cleaner cuts than a jigsaw
Safer for delicate work
Quieter operation than most power tools
What I've Learned Through Experience:
For years, I treated our old scroll saw like a workshop outcast - that temperamental tool gathering dust in the corner. As a devoted band saw user, I'd happily make multiple relief cuts to avoid wrestling with the scroll saw's finicky blades and bouncy table. That changed when I faced a project demanding intricate interior cuts that simply couldn't be done on the band saw.
Those first frustrating attempts with the scroll saw taught me several valuable lessons:
Necessity Breeds Skill: Being forced to use it for interior cuts was the best thing that could have happened. What began as reluctant necessity turned into genuine mastery through persistence.
Old Tools Can Learn New Tricks: Our vintage model's quirks - the blade-loading dance, the vibration - became manageable once I developed the right techniques:
Proper blade tension is everything
A slower, more deliberate pace yields better results
The right foot pedal control makes all the difference
Precision Over Power: Where the band saw muscles through cuts, the scroll saw dances - and I've learned to appreciate that finesse. The paper-thin kerf and ability to pivot on a dime opened up new project possibilities.
Tool Evolution: My jigsaw now gathers dust while the scroll saw has become my go-to for intricate work. It's proof that our tool preferences evolve as our skills grow.
Tips:
Practice with softwoods before attempting hardwoods
Keep extra blades on hand - they break easily
Use a magnifier if doing very detailed work
Consider a foot pedal for better control
Resawing and Thick Stock - The Band Saw Solution
Why Every Serious Woodworker Needs a Band Saw
Best for:
Resawing thick lumber into thinner boards
Cutting thick stock that other saws can't handle
Making curved cuts in thick material
Veneer production
Key Advantages:
Deep cutting capacity (up to 12" on some models)
Ability to maximize expensive hardwoods
Versatility with different blade types
Safer for certain cuts than table saws
What I've Learned Through Experience:
My bandsaw journey perfectly illustrates how the right tools can transform your woodworking capabilities. It began with a modest tabletop model that, while limited, served as my gateway to curved cuts. Though too small for resawing, this compact workhorse became indispensable for:
Shaping cutting boards with smooth, fluid curves
Crafting toy parts with consistent precision
Cutting patterns that would have been ragged with a jigsaw
But the real revelation came when we upgraded to a 14" floor-standing model this past Christmas. At first, I'll admit the size intimidated me - that massive frame and powerful motor seemed daunting compared to my familiar little benchtop saw. Yet the transition taught me several valuable lessons:
Specialization is Powerful: Keeping both saws proved genius. The small one now wears thin blades (1/8" or 1/4") for delicate work, while the big saw handles resawing with wider blades. No more constant blade changes!
Resawing Revolutionized Our Workflow: Watching my husband effortlessly slice 8" walnut into perfect 1/4" bookmatched panels made me appreciate how this capability:
Saves expensive hardwood (no more planing away precious material)
Creates stunning grain-matched pieces
Opens new design possibilities
Dust Collection Matters: The ability to connect to our main dust system keeps the shop cleaner and makes the tool more enjoyable to use for extended periods.
Overcoming Intimidation: That initial hesitation about the larger saw vanished after the first few cuts. The weight and power that seemed intimidating actually provide stability and precision I didn't know I was missing.
Now, our two bandsaws work in perfect harmony:
The benchtop: My go-to for intricate curves and small workpieces
The floor model: Our resawing powerhouse and large-project workhorse
This experience taught me that sometimes the best solution isn't choosing between tools, but finding how they can complement each other. What began as a compromise (keeping both) turned out to be the ideal setup - proof that in woodworking, as in life, growth often comes from embracing new capabilities without abandoning what already works.
Tips:
Blade tension is critical - learn to set it properly
Wider blades are better for resawing
Consider a carbide-tipped blade for hardwoods
Dust collection is essential - these saws produce lots of chips
Making Smart Saw Purchases
Building Your Saw Collection Over Time
Beginner Setup ($300-500):
Quality circular saw
Basic jigsaw
Hand saw for backup
Intermediate Setup ($800-2000):
Jobsite table saw
Compound mitre saw
Upgrade the circular saw to a cordless one
Advanced Setup ($3500+):
Cabinet table saw
Sliding compound mitre saw
Band saw
Scroll Saw
Conclusion: Matching Saws to Your Woodworking Journey
Remember that your saw collection should grow with your skills and project needs. Start with the essentials, then add specialized tools as your work demands them. A $10,000 shop full of tools you rarely use is less valuable than a modest collection of well-chosen, frequently used saws.
The most important factor isn't having every saw - it's knowing how to get the most from the ones you have. Master the fundamental techniques on basic tools before moving to more advanced equipment. Your skills, more than your tools, will determine the quality of your work.


What a fantastic, detailed guide – I love that you shared real-world lessons from your own journey, especially the bit about wrestling with that heavy old corded saw before discovering how a lighter tool changes everything. That's exactly how I felt when I finally picked up a quality hand saw for smaller, precise cuts where a power tool feels like overkill. Sometimes the simplest tool is the most satisfying to use. For anyone looking for a sharp, reliable option that won't break the bank, I recently came across a compact folding saw that's become my go-to for camping and workshop detail work – it's honestly one of the best hand wood saw options I've found for the price. Thanks for…